Author Topic: How to make combination cabochons  (Read 6640 times)

0 Members and 1 Guest are viewing this topic.

Old Hickory

  • Newbie
  • *
  • Posts: 40
  • Gender: Male
    • View Profile
Re: How to make combination cabochons
« Reply #15 on: July 12, 2009, 09:17:28 AM »
Fantastic looking cab Ron. One question I have is what type of epoxy are you using?
Ron

BUYING QUALITY PRODUCTS IS LIKE BUYING OATS. If you want nice, clean fresh oats you must pay a fair price. However if you can be satisfied with oats that have ALREADY BEEN THROUGH THE HORSE....... "WELL THAT COMES A LITTLE CHEAPER"

Bluesssman

  • Guest
Re: How to make combination cabochons
« Reply #16 on: July 12, 2009, 03:30:00 PM »
I have been using Epoxy 330 for all of my rock gluing. It is clear and takes a polish.


Gary

theimage1

  • Guest
Re: How to make combination cabochons
« Reply #17 on: July 13, 2009, 06:24:28 PM »
When I am working single stones and am in a bit of hurry I use an Epoxy called UHU Creativ (Available at most Michaels-craft stores in the jewelry section - its marked good for glass, ceramic and jewelry).

It can be mixed for 60 seconds and you have almost exactly 3.5 minutes of working time, in the next 30 seconds it sets up and a the 5 minute mark it's all done as far as movement is concerned. It actually continues to get harder for about 24 hours - but you can put the saw to it within 10 minutes in most cases. After he 5 minutes I usually heat it under an incandescent bulb for another 5 minutes and then continue with whatever process I am working on.

I use Epoxy 330 when I need extra clear of if I need longer working time, it lasts about 15-20 minutes. It's good for heating the bubbles out under an incandescent light when making doublets or triplets.

Here are a couple more I did at the class I taught this last week. The first pair were a test to see how well the students could do 2 different hardness materials side by side,  another used up scrap material, one was a first attempt at a curved internal frame using the natural shape of 6" Genie wheel, the last show the starting glue up and a "1/2" finish.

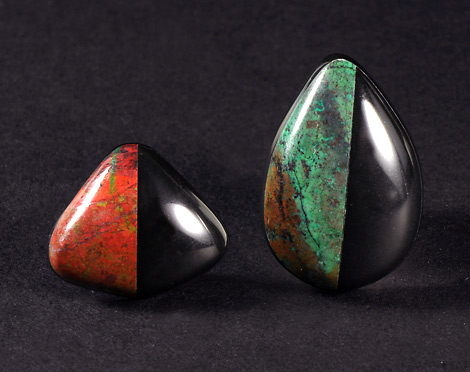
A stone with both a hard and soft material side by side - a little test of cutting two different materials and maintaining an even look ... sonora sunrise - black jade


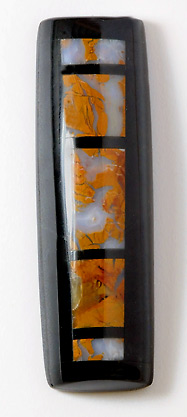
So what do you do with small cut-offs and scraps - glue them up together and form a multi-part composite


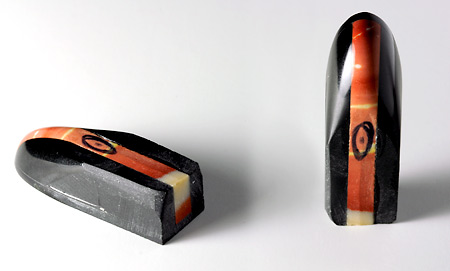
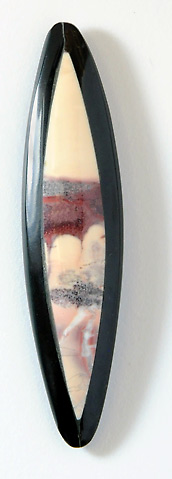
Finally when I had a little time to experiment, I tried to use the 6" Genie wheel shape to make a rounded frame and cut a center to match. THis stone domes on both sides. Not bad for a first try!


One more 1/2 done cab to show them how to maintain a high dome without destroying it. Keep the bulls-eye on top until all else is done!


hulagrub

  • Hero Member
  • *****
  • Posts: 6748
  • Gender: Male
  • When you cultivate man, you turn up all the clods
    • View Profile
Re: How to make combination cabochons
« Reply #18 on: August 18, 2009, 05:12:16 PM »
The tutorials on the forum are just wonderful, and this is just beautiful work. I am learning so much, now just need the time, because of all the inspiration.
Dave, a certified Rockaholic


Freeform

  • Guest
Re: How to make combination cabochons
« Reply #19 on: August 18, 2009, 09:24:57 PM »
great job on the work and info sharing Image1! indeed inspiring. Very bead like.

thewrightthings

  • Guest
Re: How to make combination cabochons
« Reply #20 on: September 12, 2009, 10:00:58 AM »
Thanks for those combination cab examples.  Never really thought about doing that till I saw those gorgeous images.  That's a whole new option to try.  Now if I could get off this darn computer and start making some cabs and jewelry........!

gregorgr8

  • Guest
Re: How to make combination cabochons
« Reply #21 on: September 17, 2009, 04:33:01 PM »
VERY NICE !    I have done a flat intarsia, but never thought about just cabbing it.  That would be easier and quicker, I think.
It takes very long to flat lap it.

Gregor

christopherl1234

  • Hero Member
  • *****
  • Posts: 4247
  • Gender: Male
    • View Profile
Re: How to make combination cabochons
« Reply #22 on: October 14, 2009, 09:46:49 AM »
Awesome idea for using up scrap. I used to just put in a container till I had enough to tumble. Now I have to reconsider that practice. This opens up a whole new realm of possibilities. Thank you for sharing this.

jackd

  • Guest
Re: How to make combination cabochons
« Reply #23 on: April 11, 2012, 09:55:51 AM »
Fantastic, thanks for posting the steps. Got to try the framing..

DadOhs

  • Full Member
  • ***
  • Posts: 126
  • Take me to your Labradorite!!
    • View Profile
    • dad-ohs.tripod.com/
Re: How to make combination cabochons
« Reply #24 on: December 02, 2012, 02:46:15 PM »
Hope nobody minds I copied this to word to keep a hard copy because I want to try this... and because some of what  have looked for on here has been deleted over time and no one seems to have it.

Mario

Just when everyone thought I was finally gonna clean up my act, I found a new way to get muddy.

I once sought the meaning of life, but I got side tracked by an agate!