Author Topic: Beginners Guide to Grinding, Sanding and Polishing Gemstone Cabochons  (Read 21003 times)

0 Members and 1 Guest are viewing this topic.

Taogem

  • Hero Member
  • *****
  • Posts: 12153
  • Gender: Male
    • View Profile
I have mentioned it before.

The single most important hurdle for a beginner is getting at least somewhat of a handle on the graduated stages from grinding, sanding and a nice polish.

Believe me.. I remember all to well. Bought my first combo unit. A Highland Park. It came with one course 80 , and 400 grit diamond sintered wheels. Then on the end of the unit I can attach either a flat metal disc with felt padding and a leather pad over the top. Then I have two other flat rubber padded discs that I can place silicon papers on. I have to use a spray glue that comes in an spray can. I found myself using a 400 grit on one, and a 600 grit on the second.

I also decided to bring home a double sided arbor that I placed expando type wheels on. This let me have the ability to have another 80 and 220 grit silicon carbide papers as well.

Here is my start up equipment, and I still use them every day.

The basic idea was to the best of my ability have some sort of progression of grits and work them to the best of my ability with this limited equipment that I was limited to because of cost.

This combination worked excellent through my first year of cabbing. Truth is I have added a few additional arbor type set ups. The only real reason is for convenience. I do not do anything any differently in regards to progressions between grits now than when I first started except that now with the additional arbors, I can move easily between a greater variety of papers abrasives.

If you can not invest in an additional arbor as I was able too, then you will simply need to spend a little more time removing and replacing various grits of paper out on the one or two wheels that came with your combo cabochon trim saw unit.

We have had several folks join the forum who are in the beginning stages of setting up shop. Like yourselves, I remember all too well having brought my new toys home, preparing a work area, and bolting the equipment to a workbench. I was eager to get started, but just had limited knowledge about how to cab.

One thing you will find, is that you will be working differently with various minerals. I would like to share the most basic steps with a couple of most basic minerals based on hardness.

Again....... this is very basic and there are a great many types of minerals varying in hardness on MOHS scale of hardness from one to ten. Ten being the hardest.

I thought would use a basic Jasper as well as a run of the mill agate for the following guide.

The jasper being about a 5 in hardness and the agate upwards of about an eight. The difference and reason I decided to use the two is because as an example, an 80 grit will leave heavier scratches or a courser surface on a Jasper than will it on an Agate.

Bypassing the entire process of cutting out your preform, and shaping it we are going to get right into the initial grinding. Although, it is important to note the importance of creating at least a slight dome to the surface of your cab. Otherwise you will not be able to polish the cab completely. A completely flat cab will not polish at the center of it's surface.


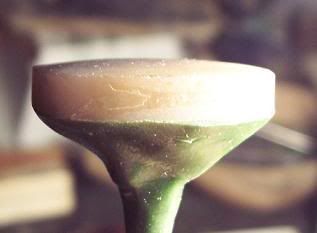
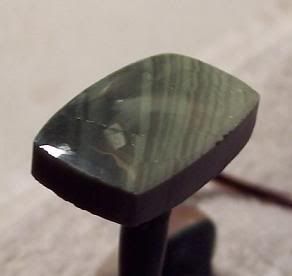
Here are the surfaces of both the Jasper and Agate right off a 80 grit diamond sintered wheel. Your initial course grinding tool may be any number of things. From carborundum, diamond, sintered diamond, or maybe your limited to silicon carbide. No matter.....


The surface is going to be rough and will show lines created by the heavy, course grit. One thing to remember as you proceed through the stages of grinding and sanding as well, is that there is no need to press hard against your wheels or paper. Your just going to wear your wheels out sooner and replace your paper out every other day. You will find yourself spending a lot of wasted money on paper belts that should have lasted a long time.

Let each and every grit grind as it will with hardly any pressure applied. I do not work with diamond paper. I am told this is especially true with it though. Other wise a person will spend about 50 bucks a belt real fast if pressure is applied instead of just letting the diamond cut at it's own pace. Pressure makes absolutely no difference at all.

Now take a close look at your cab prior to moving on to your next grit. I took the agate cab to a 220 grit silicon carbide belt, and the jasper to a 400. The jasper is softer and find that as with a lot of minerals we can skip a grit sometimes. I do not want to remove any more material than I have too.

Work it your stone nice and easy......

View video one for a short glimpse of the Agate on a 220 grit, and view the second video for a glimpse of the Jasper on a 400 grit.

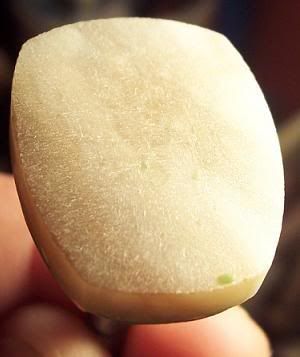
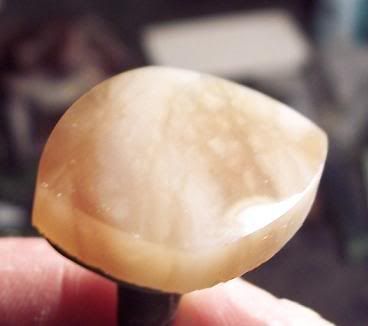
Here is as good a couple of pics of the surfaces for both the agate after being sanded on the 220 and the Jasper off the 400.


You can already feel the difference with your fingers not to mention see the difference as well. It is a dramatic difference. Make it a habit prior to moving on to your next finer paper to inspect closely for any scratches that stand out. Scratches that are obvious and stand out over the course surface as a whole. The surface of the cab should be consistent. If you see a scratch that stands out, continue with the grit you just finished with until you have achieved a surface without any irregular scratches.

Move on the your next finer grits. I moved on to a 400 for the Agate and and a 600 for the Jasper.

A video if you 
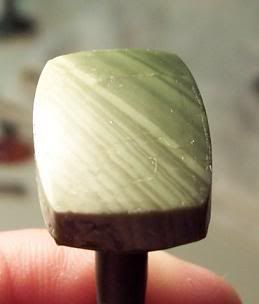
would like to see a glimpse.

Here are the surfaces once the Agate was removed from the 400 and the Jasper off the 600. Again, look closely for abnormal scratches, and any pitting that may show themselves.


You can if you like, take the Agate to the next finer 600 grit paper if you like. I did not find it necessary. But this was just me. Everyone sorta works a mineral a little differently I think. Lots of variables.

I found that the 400 was fine and I was pleased with the surface of the Jasper after it's round with the 600.

Now I want to do a real fine paper combined with some tin oxide paste. You can use this step like I am showing on a circular wheel or you can do the same with a flat disc that we talked about earlier included with most combination cabbing machines.

This video gives a glimpse of me using a somewhat worn 600 grit paper with the oxide paste. I took the Agate and Jasper through this step. The final sanding step to polishing.

I spent quite a bit of time on this step. More so with the Agate than the Jasper. Again, only because the Agate is softer.

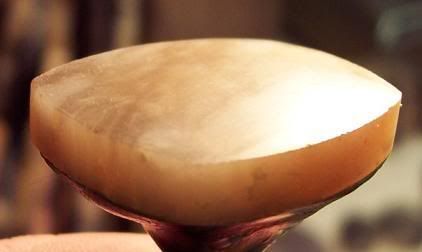
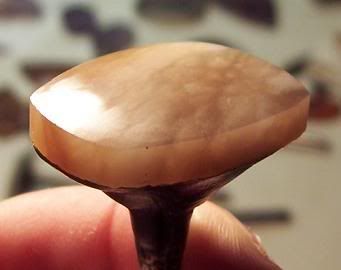
Here are the two stones after some time on this step. The Agate is a bit easier to see the changes in. Only because of the quality of the pictures. Hard to show like I would like to have been able too.


Now we are ready to hit the polishing pad. I have talked before about the use of building up friction while polishing in order to create heat so as to sorta melt the oxides into the stone. This can result in a great shine.

For this tutorial, I would like to have you disregard that theory, and consider working with it as you become more comfortable with the polishing process. There are considerations like cracking of your cab due to the heat.

Continuing with the basics, we will treat the oxide polish just like any other abrasive step.

Take a look at this video clip. It shows the application of the oxide paste to a leather pad. Once I applied the paste as shown in the clip, I leave the wheel running long enough to dry out the paste on the leather polishing pad.

What this does is turn the polishing step into more of an abrasive step. It is dry not wet. Polishing with your oxide as a wet paste on the pad has it's place too. For this short guide, I am using it dry.

What I am going to do is continue on through the final phase, the polishing phase, but I am using the paste in the same way as I did any other step prior. Letting the abrasive polish in this case in accordance to it's own grit. Not pressing hard. Letting the oxide polish as it will naturally in accordance to the oxides grit ability. Nice and easy......

Here is a short video clip showing this step. Nice an easy.. Gradually pressing just a little more. Not a lot. Pressing just a little more, but not enough to let the stone develop any heat. Another short video showing the same.

For what it's worth, these two clips give the impression that the polishing pad is moving sort of slow. In fact it is moving rather fast. I find better results with a faster moving pad than a slow one. I don't know why the video gives the impression it moves so slow, but I would guess that in fact it moves about twice as fast as it appears in the clips.

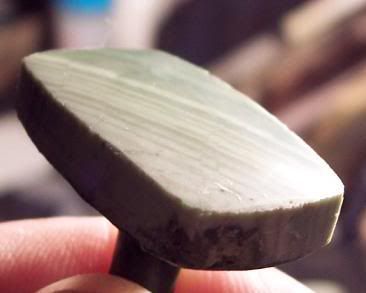
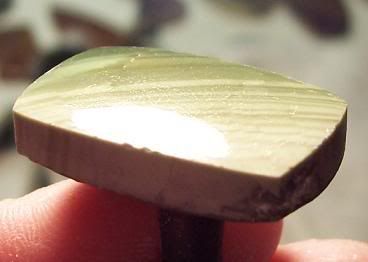
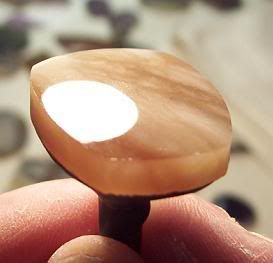
Finally, we can see a pretty nice finish on the two cabs we started with. Neither of these have been beveled or had the edges rounded. This short tutorial was just to show basic grinding, sanding and polishing.

The truth is that there are variations of these steps. You can find yourself using a worn 400 grit belt instead of a new 600 grit belt as an example. There are many variations, but the end result and the basic process is the same. That is to work through a series of different abrasives that will bring your cabochon to a desired state that you believe will allow you to move from sanding to polishing. Remember too that it is not uncommon to realize that you have to repeat a step. This is discovered as you spend more time sanding. It is a learning process. Just keep at it and have fun  :)

If you have tutorials related in any way to lapidary work. Either with gemstones or jewelry, please post them. It does not matter if either myself or another member has posted a similar guide. We can all benefit by learning how similar processes/techniques work differently and successfully for each of us.

We are gaining new members who are looking for resources on how to learn different lapidary related niches. Interests in both jewelry design as well as working with gemstones. If you have a little something in the form of a guide or tutorial, we would love to see them.

On the other side of the coin. If you would like to see something specific in the form of a tutorial or guide, please feel free to request it from where ever you like on the forum. Or PM me and I will make a general announcement for your request.


Hope ya liked this one!


freeform

  • Guest
Re: Beginners Guide to Grinding, Sanding and Polishing
« Reply #1 on: May 25, 2008, 09:47:15 AM »
Hey Tao, excellent info and thanks for sharing it with everyone. I like how you provided video links, too bad they cant be embedded here in the forum. Is that Neil Diamond i hear?  lol

I noticed your sanding wheels look to be moving slow, but know how the lens in cameras work and suspect its just that. On the fast speed on polishing, i would be very careful with fast dry polishing, this can and will create fractures in stones like agate and jasper. Ive always experinced to dry polish using a slow RPM, around 800-1000. But i dont polish my stones that way anymore. I do dry polish on resin belts using diamond paste, which does not create too much heat, and doesnt cross contimate as easily as felt or leather. And i can get the resin belts wet during polishing incase of heat big up. But it polishes so fast, that is rarely a problem with agates or jaspers.  Thanks again for sharing this great write up.

Taogem

  • Hero Member
  • *****
  • Posts: 12153
  • Gender: Male
    • View Profile
Re: Beginners Guide to Grinding, Sanding and Polishing
« Reply #2 on: May 25, 2008, 12:58:18 PM »
Yes, for what ever reason both the sanding wheels and polishing pad appear slow.

That was sorta what I meant by running my polishing pad faster than what it appears to be moving in the video.

I agree completely with the speed you mention, and tried to make a point about not applying a lot of pressure to so as to avoid heat build up while using the dry polish.

I may well be able to embed the video directly onto the forum. I will check that out. Thanks for bringing that up too.

Thanks....  :)

jjack9485

  • Guest
Re: Beginners Guide to Grinding, Sanding and Polishing
« Reply #3 on: June 05, 2008, 03:56:18 PM »
George,

This tutorial is great, I keep coming back to it time and time again. Well I have ground 4 or 5 cabs now, not the best but getting better , still not been able to achieve a high gloss yet.

Thanks again, i know y'all are probably getting tired if my dumb questions. Boy what a vast amount of knowledge on this forum....I check it several times a day.

jack


Taogem

  • Hero Member
  • *****
  • Posts: 12153
  • Gender: Male
    • View Profile
Re: Beginners Guide to Grinding, Sanding and Polishing
« Reply #4 on: June 05, 2008, 06:44:58 PM »
i know y'all are probably getting tired if my dumb questions.

jack


Gotta put a stop to that right away Jack.

Every single question is eagerly welcomed. Please don't ever think there is a dumb question on this forum.

Have your been following my questions?  :o  Talk about off the wall....... , but we are fortunate to have some long time cabbers on here that have been down our road before.

It's the questions and the new people asking them that make our forum what it is.  :)

Won't be long and you will find yourself answering the questions for other yet to come new members.

Glad your here!


Taogem

  • Hero Member
  • *****
  • Posts: 12153
  • Gender: Male
    • View Profile
When to change leather polishing pad
« Reply #5 on: July 06, 2008, 06:06:29 PM »
There comes a point when particulates begin to accumulate in the leather when using oxide polishes.

Scratches begin to appear on surfaces that were not there after final sanding.

I seem to be able to get away one time with taking a wire brush to the leather while turning, removing everything from the leather.

The next time scratches begin to appear it is time for me to change out the leather.

You can run your fingers across the leather and feel some very rough or prickly areas that obviously are causing the scratches. Not sure what causes this. Don't think it is particulates. Maybe something happens to the leather that causes it to become hard or crystallized.

Just for information, thought I might share the way I change out the leather.

you can order your leather, or cut it from scraps. Either soft cow hide or elk hides are generally preferred.

I like to use the rougher of the two sides. Although you can use the smoother. Remember to cut or order the new piece a couple inches larger than the diameter of your disc. It is nearly impossible to get a eight inch leather to stretch over a eight inch disc.

First I soak the leather so I can begin to stretch it by hand. I will spend about a half hour playing with it. Soaking and stretching.

I always need an extra set of hands to help me get the spring and wire in place over the leather properly.

Once on, I take a pair of pliers and begin rotating around the leather stretching it tight beneath the wire. Constantly adjusting the wire to fit back into the grove on the outer part of the disc.

I let it sit until dry before using because the outer part of the disc does not really get wet, I like to let the wire really get a nice seat. Maybe it helps keep everything in place ...

You can trim it if you like. I leave the extra leather hanging in case the wire gives. I can replace the same piece of leather, where as if it is trimmed closely, again, it will be really difficult to get on.

This time unlike before, I removed the felt and replaced it with some soft quarter inch padding. I think that the ability to work the stone over a nice soft and flexible area will be better than a hard non give surface.

Anxious to see if it helps  :)

And just two more cents worth.... I try and keep my polishing table/surface area wiped clean and even then, if I drop the stone while polishing, will always take a second and dip it in some clean water to keep any chance of particles off the leather.


Will let ya know if the soft foam type padding helps a little.


Taogem

  • Hero Member
  • *****
  • Posts: 12153
  • Gender: Male
    • View Profile
Re: Beginners Guide to Grinding, Sanding and Polishing Gemstone Cabochons
« Reply #6 on: November 25, 2008, 05:16:22 PM »
I started experiencing some fine scratches as I was polishing some stones today.

I spent about an hour playing with the last couple of silicon carbide abrasive papers trying to get them to disappear from the stone. No matter what I did, after polishing, those pesky little scratches just kept showing themselves.

I started to wonder if there could be some reason that the leather pad I was using with the tin oxide had something to do with it. It was not all that old.

Sure enough... Replacing the leather pad did the trick.

Back to seeing the gloss less the scratches !  ;D

Just thought would share......

So maybe if your experiencing the same? Consider replacing the leather !


Taogem

  • Hero Member
  • *****
  • Posts: 12153
  • Gender: Male
    • View Profile
Re: Beginners Guide to Grinding, Sanding and Polishing Gemstone Cabochons
« Reply #7 on: December 06, 2008, 08:23:01 PM »
Leaning something new today..

When I hit the rock shop to purchase oxide polishes, I just grab a bag.

Looking through James site, I learned that it can be purchased in more detail.

Aluminum Oxide 800 grit Pre-Polish 
0.35 micron Aluminum Oxide 
0.2 micron Aluminum Oxide 
0.8 micron Aluminum Oxide 
1.6 micron Aluminum Oxide 


Northstar

  • Full Member
  • ***
  • Posts: 134
    • View Profile
Re: Beginners Guide to Grinding, Sanding and Polishing Gemstone Cabochons
« Reply #8 on: November 24, 2010, 03:29:57 AM »
Any difference in price?
Patrick

ddt

  • Guest
Re: Beginners Guide to Grinding, Sanding and Polishing Gemstone Cabochons
« Reply #9 on: January 13, 2013, 03:55:38 PM »
Hellooo, help26
 I bought a small combo machine awhile back that came with two polishing pads that fit on the end of the arbor? One is canvas the other is leather, how does one apply CO to either of them? How thick should the CO slurry be?  What do any of you think is the best type of pad to use for opal?, I can order a felt one.  Thank you

Rockrangers

  • Guest
Re: Beginners Guide to Grinding, Sanding and Polishing Gemstone Cabochons
« Reply #10 on: January 13, 2013, 04:33:57 PM »
Hellooo, help26
 I bought a small combo machine awhile back that came with two polishing pads that fit on the end of the arbor? One is canvas the other is leather, how does one apply CO to either of them? How thick should the CO slurry be?  What do any of you think is the best type of pad to use for opal?, I can order a felt one.  Thank you
If its in powder form you need to make it into a paste"not to runny but not thick" like soft peanut butter. If its premix just add it to your pad.
Important...Dont cross contaminate by reuseing the same pad with different polishes.

ddt

  • Guest
Re: Beginners Guide to Grinding, Sanding and Polishing Gemstone Cabochons
« Reply #11 on: January 15, 2013, 08:03:52 AM »
Thanks for the help RR, let you know what happens.

mirkaba

  • Hero Member
  • *****
  • Posts: 2303
  • Gender: Male
    • View Profile
Re: Beginners Guide to Grinding, Sanding and Polishing Gemstone Cabochons
« Reply #12 on: January 15, 2013, 08:20:04 AM »
Hi ddt.........I usually use leather with the oxides. I have a small Tupperware container with a lid that I mix the polish in. I fill it about 1/4 full and wet to a thick, sticky consistancy and dip the cab in it as I need more polish. Soak the leather down with a spray bottle first. I used to do the same with Opal but I use Diamond paste on crystal belts now. Good Luck...........Bob
Bob

Gathering dust in Montana.

ddt

  • Guest
Re: Beginners Guide to Grinding, Sanding and Polishing Gemstone Cabochons
« Reply #13 on: January 21, 2013, 08:09:06 AM »
Hi mirkaba, what's a crystal belt?

HarveyDunn

  • Guest
Re: Beginners Guide to Grinding, Sanding and Polishing Gemstone Cabochons
« Reply #14 on: September 05, 2013, 01:19:12 PM »
Wow, what an awesome tutorial. Thanks so much

I'd like to ask about this:
<blockquote>Although, it is important to note the importance of creating at least a slight dome to the surface of your cab. Otherwise you will not be able to polish the cab completely. A completely flat cab will not polish at the center of it's surface.</blockquote>

I am going to set myself up to make intarsia for jewelry. I'm not interested in making cabs. And I want the finished product to be flat. So I was going to buy just a bandsaw and a flat lap.  Am I going to have a problem polishing the centers?